Cutting Tips
We all know how to run that new scroll saw that we just received. Take it
out of the box and set it on the bench , turn it on and go. Remember that the
manual was made for the dumb people, we don't need it. Well in away that is
right, the manuals don't tell us how to actually cut on the saw. They just tell
us all about the saw.
So what did we learn form trying to just take off cutting. First thing we
found out is that the blades don't cut in line with the arm. They all seem to
cut off to the right. This is caused from the manufacturing process used on the
blade. If you very lightly run your finger up the left and right side of the
blade you will notice that the blade has a sharper edge on the right side, This
burr is like the tearout we see on the bottom of the wood that we just sawed.
But this burr also causes us a problem that it makes the right side of the blade
cut better. If you try this with the Precision Ground blades , there will not be
a burr. The PGT ( Precision Ground Tooth) blade are manufactured a different way
to eliminate the burr. But I'm not suggesting that you only buy PGT blades.
There are easier ways to cope with the burr problem.
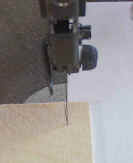
Get back on the saw. Take a piece of wood and cut into it by feeding it
straight into the blade, alined with the center of the top arm. Cut about ½"
to ¾" into the wood.
Notice how the blade cut off to the right. Leave the wood in place on the saw
table.
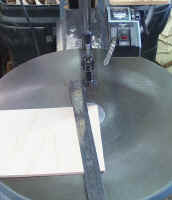
Now lay a ruler along the cut line that the blade just made. Notice that it points off to the left side of the rear of the saw. Move yourself around to saw until you are looking straight down the ruler, you should be about 3" - 5" to the right of the center of the saw. Remember where you are at. Now take that same piece of wood and again try cutting into it in a straight line, by pushing it straight into the blade. Notice how much easier it is to follow the line. From this position we can actually feed the wood straight at the blade and it really follows the line. Isn't that neat.
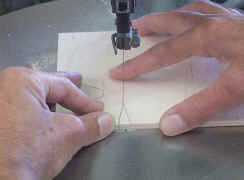
Next look at how you are holding onto the wood. Most people have taken the hold down off the saw, so that they have easier access and a better view to the blade cutting area. That means you are going to have to apply some down pressure to the wood. We are not saying white knuckle pressure, just some pressure. You are also going the have to have a hold that allows you move the wood around the blade. Remember with the scrollsaw you are feeding the wood at the blade, not the blade at the wood. Place on hand on each side of the blade onto the wood. I find the best way is to hook the tip of the thumb and one finger over the edge of the wood, and use the rest of the fingers as the hold down fingers.
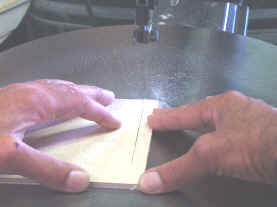
For making straight line cuts , both hands will feed the wood straight at the blade. Since we are in line with the cutting path of the blade, we will end up with a straight cut on that line.
Always keep your fingers off to the sides of the blade, so that if your finger slides it does not slide into the blade. On some cuts where you are trying to shave off a narrow strip , the blade could jump out of the cut allowing the wood to jump forward. And if your finger was in that path it goes forward right into the blade, not a good thing. This explains the holding of the wood for straight line cuts, but for curves, there are some other factors.
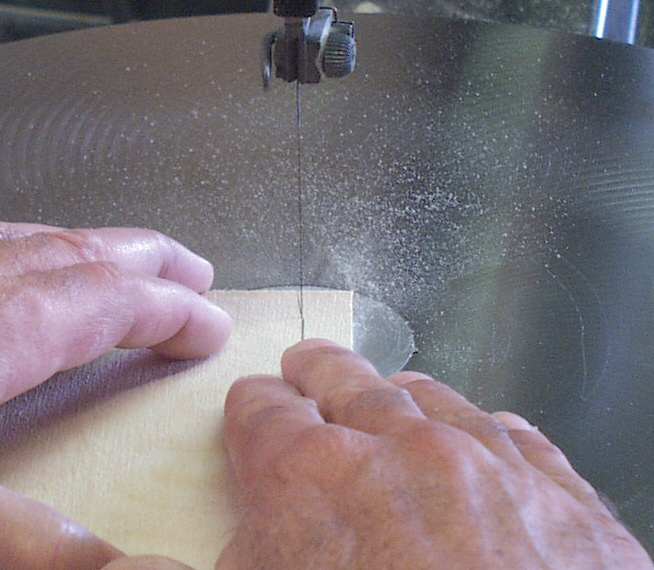
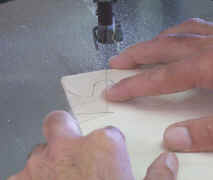
For making smooth curves you will need to have a pivot point for your
wood. This pivot is made by using a finger tip. This is done by placing the
finger tip on the wood and applying enough pressure so that the wood will pivot
around your finger. Now you use the other hand to pivot the wood through the
curve line you are trying to cut. Depending on the direction of the curve will
dictate which hand it the pivot and which hand will be doing the turning. So
when making curves and turns, one hand will be stationary and the other hand
will do the turning. A little
different than the method used for cutting straight lines.
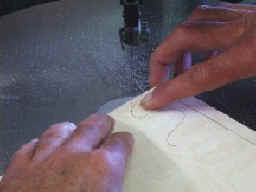
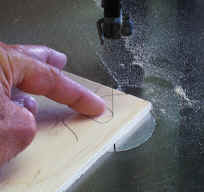
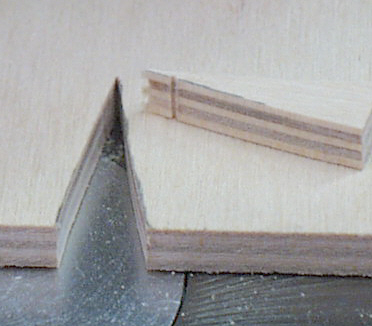
To cut those tight "V" type notches we use a different approach. Cut down to the bottom of the "V" then back up into kerf you just cut. Using the back of the blade to slide on the save piece of wood, let the teeth cut into the scrap wood as you flip the wood around to reverse the direction of the blade. Now back the blade down into the end of the cut . Turn the wood to the new direction and cut out following the new line. This gives you a nice tight "V" cut and does not show those tell tale marks of cutting into the end of the "V" from both direction. That method means you will have a starting cut back into the line just a little ways from the "V" notch. Every time you start a cut into a line there is a chance to leave a nib of wood at that point , that will need to be sanded off later.
Using these methods for cutting, you should have a little better luck at
getting the blade to go where you wanted it to. Remember that for straight lines
both hands feed the wood at the blade. For curved lines one hand is the pivot
and the other hand will move the wood. And most important is to keep the fingers
out of the blade path.