Fretwork
We have all seen the fancy fretwork designs and
wonder what is the easiest way to do it. There are a lot of techniques for doing
fretwork and we will try to cover some of the more common ones here. If you are
already doing fretwork you should see if you can pick up any new tips here.
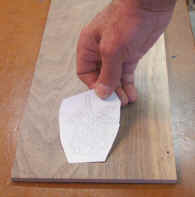
After choosing the pattern we want to cut the first step is to select the wood. Take a minute to examine the pattern and wood grain. Many times there are grains or defects in the wood that could compliment the pattern. But only if the pattern is laid onto the wood in the right direction. Try to imagine the colors and grains of the wood that would be left on the final piece after cutting is complete. It is surprising how much you can change the looks of a piece just with the grain.
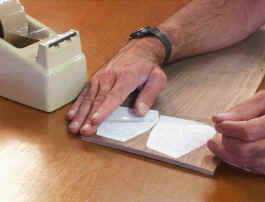
To get the pattern to the wood , the easiest is to
photocopy it and attach with spray glue. There are many brands on the market to
chose from. Practice with the brand you use will teach you how much to use and
how long to let it dry before applying the pattern to the wood. If you cannot
get the pattern off the wood after cutting, try heating it with a heat gun, or
spraying it with paint thinner or laquer thinner. If the patterns fall off the
wood before you are done, you probably let the glue dry too long. All of the
sprays seem to work differently, so practice is the secret to success. The
patterns could also be traced and transferred with graphite paper, but this
method is very time consuming on complex patterns.
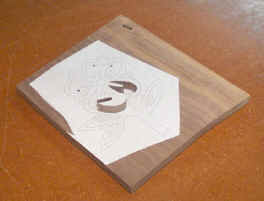
A new idea of placing clear packing tape over the wood and pattern, will help keep the edges of the cut from burning. You may even notice the blade seems to cut easier and lasts longer. It has not be proven, but is presumed that the glue in the tape actually lubricates the cut. No matter what the reason is, the fact is that it does help eliminate the burning of the edges of the wood. Some prefer to place the tape on the wood, then apply the pattern to the tape. Others prefer to apply the pattern to the wood, then tape over the pattern. I prefer the tape over the pattern, as I find the spray adhesive held pattern is easier to remove from the wood than the tape.
The paper pattern need to be lined up with the wood grain
that you have decided to use for the best color.
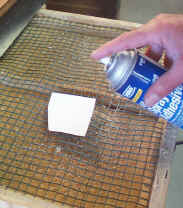
The spray drawer is used to keep from getting over spray on the surrounding are. The drawer is simply a shallow drawer with hardware wire mounted about 1" off the bottom of the drawer.
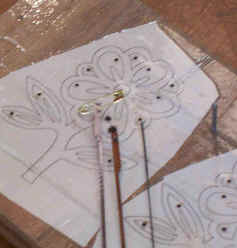
Now with the pattern applied , it is time to drill the
holes. No, the wood does not come predrilled. If you are using a saw that has
the pin end blades, larger holes are needed to get the pin through. The pin end
blade are normally larger blades too, so they do not do as well on fine detail.
The pin can be driven out of the top of the blade and replaced with a safety
pin, to help thread them into smaller holes. The plain end blades can be fed
through a lot smaller hole, and come in smaller sizes, making them able to do
finer detail in fretwork.
The clear packing tape placed over the pattern and wood
does two things. It helps to hold the pattern to the wood, but it's main purpose
is to lubricate the blade in the hardwoods, to keep the edge of the cut from
burning.
The type of blade you use will have a lot of bearing on the hole size. With the # 2 blade we can easy use a 1/16" blade. With a pin end blade a 5/32" hole is needed, and by removing the pin we can go down to a 7/64" hole. But some areas of even this large fretwork may not have room for the 7/64" hole in the space to be removed.
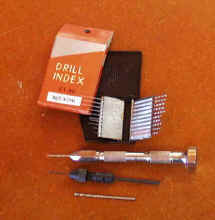
A 1/16' drill bit is shown on the bottom. The pin vice adapter to fit into a drill, and the hand pin vice are shown. This is a normal set of pin drills.
Depending on the size of the areas to be cut out determines
the size drill bit to use. Usually the largest bit I use is a 1/4”, because
that is more than large enough to feed a blade through. Smaller bits must be
used when the area to be cut is
smaller than the drill bit. Normally 1/8” and 1/16” drill bits will work in
most smaller areas. For smaller areas there are mini drills, which can be
purchased as a set, or individually. These range in size from .0139 up to .039,
compared to a 1/16” drill bit that is .0652. For the really fine sizes you
will need a pin vice, available from the same sources as the bits, to hold the
bits.
Now with the holes done it is time to start cutting.
Different saws, because of the blade clamp design , require different ways to
thread the blade. The majority of the saws you will release the blade form the
top clamp and feed the blade up from the bottom of the wood. On a couple of the
saws you can now feed the blade down from the top. And on a few saws both the
top and bottom clamp can be removed , then the blade and clamps are installed
into the wood , then the whole unit is placed back onto the saw table while
sliding the clamp in place. Whichever way you use the same thing is
accomplished, you end up with the blade threaded through the hole so you can
make the cut. Then you cut that are out, release the blade and do it all over
again. Before you realize it the project is completed.
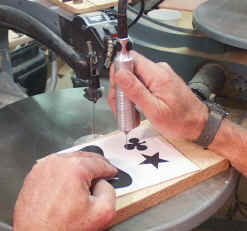
Drilling can be accomplished in many ways. A cordless or
electric hand drill may be what you use. A step higher would be the drill press.
But for a big share of the holes I like using the moto tools. These little tools
will hold small drill bits with the use of the right size of collets. And they
are light weight and fast and easy to move around the piece drilling holes. I
like the flex shaft tools even better because of their smaller size for
maneuvering around the work.
On most saws, like the Q3, you feed the blade in from the
bottom.
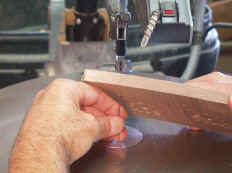
But on the Dewalt you can feed the blade in from the top, while the work is laying on the table.
Drilling the holes in the right place can be a time saver
when you start cutting. If you drill the hole in the center of the area, you
will be cutting a lot of waste just to get to the cutting line. Determine where
you feel comfortable starting the cut at. Usually at a corner, or along the
straight line. The hole should be near the cutting line but so close that you
nick the cutting line.
In a pattern with small areas to remove the hole placement
is not as important. But in larger pattern with a lot of waste area, hole
placement can make a lot of extra cutting just to get to the line.
But do not get the holes so close to the line that you leave a nick in the finished work.
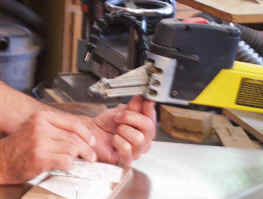
I prefer to have the flex shaft tool hanging right over the
saw. By using a scrap as a backer board, I can drill the holes right at the saw.
With the hole here you are starting close to the line to be
cut. If you drill in the center, there is a lot of scrap to cut just to get to
the line.