Excalibar Tune Up
From Ray Seymore: Seyco Ray's website is SEYCO. We need to ask you assistance with a matter that has surfaced regarding repair procedures to the Excalibur 21. Assembly techniques experience minor changes from time to time making the information that we may give one customer non-applicable to another customers saw. For example the bolt tightening procedure discussed in this page does not apply to the current production of Excalibur saws and can (and has!) led to an aggressive attempt to tighten the bolt on a current saw resulting in breaking the bolt which led to the need for a more complex and more expensive repair procedure. DO NOT RISK VOIDING YOUR EXCALIBUR SCROLL SAW WARRANTY! Please be sure to verify any suggested repair procedure with our qualified service technicians, at General International or Seyco, before you perform that procedure on your saw. Patrick Magro, Excalibur Product Manager - General International and Ray Seymore, Seyco, The Scroll Saw Specialists, INC.
|
Here are some emails I received on the Excalibar and my replies to them explaining the solutions as I see them.
1. Question
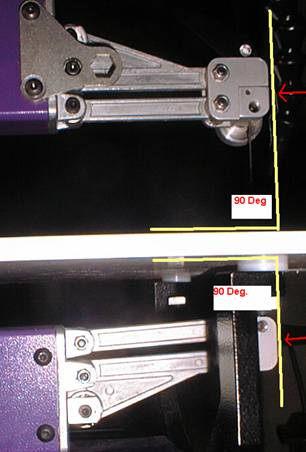
Three weeks ago I ordered a Excalibur 19". Upon first use I noticed the top arm was bent to the left if looking at the front. I traded it for a 30". The 19" had horrible vibration and knocking noises. I attempted some puzzles on the 30" The wood was being picked up in straight cuts and more so in corners. After measuring and checking I noticed that the front to back movement was excessive. Sommerville claims the front to back movement is only .026" which is less than 1/32", mine is moving more. So I was now told to look at the rocker arm and struts. First I made sure the top strut was parallel with the upper arm. Once this had been done I noticed that the lower strut and rocker arm were not parallel, but was upward. After attempting to adjust the lower arm I found I could not get both struts and rocker arms perfectly parallel with one another. I also noticed something worse; a slight twist to the upper arm and blade wobble of 1/32" (left to right). I have four pictures included, one showing the blade tracking problem which I think is caused by the upper arm twist and a Starrett square next to the upper arm showing the rightward twist of the arm. I'm no expert on scroll saw mechanics, especially one as complicated and easily damaged as the Ex 30. What would you do in my circumstances?
Answer to 1
I have looked at my saw and can't see much of a way the arm can get out of
line. But there is a way the blade can be off line
like you show. Where you are showing the blade is moving left and
right, the clamps need adjusted. Run the blade down , place a ruler on the side
of the blade. Hold the ruler, run the blade up. Yours seem to be the blade is
moving off to the right. Loosen the top blade clamp, then using an
allen wrench to back the allen screw out on the left side of the clamp. This
will allow the top of the blade to move over to the left when you tighten the
clamp on the blade. You may need to do the opposite to the bottom clamp to help
take up excess error if needed. When you can run the blade up and down without
the blade moving side to side, the clamps are set right to make
the blade run true to the arms. Now set the table to be square to the blade Now
check your arms to the table again and see if that fixes your alignment problem.
The way your blade is currently running off it would cause the lift you are
talking about. Once the blade is trued up to the movement of the arms, your lift
problem should be OK.
From Seyco: Just a side note on the arm support tubing being out-of-square. In assembly the factory aligns the rocker arms that hold the blade and not the tubing, so the actual sawing is obviously not affected.
Extra comments on this matter:
From Seyco:
As stated previously, I
am proud we finally got a saw to you that was
> aligned and working to your satisfaction. Thank you for the e-mail stating
> this. The remaining question I have is--
> "Has SEYCO resolved the problems/issues you had with your Seyco/Excalibur
> purchase?"
> THANKS, Ray
Reply:
Yes everything is good.
2. Question
I have a few simple questions about the Excalibur 30 Rick.
My questions are in response to the blade clamps. I don't understand the engineering as much as I would like. I have learned most of what I know from either you or Patrick S. and his books.
My
questions are regarding blade suspension. On many saws the blade is allowed to
pivot at the blade clamps, i.e. Hegner's knife edge clamps.
Should
the blade clamp blocks be square with the top and bottom of the table on my
Excalibur?
So
is the surface where the red arrow is pointing supposed to be square with the
table on top and bottom for the blade to remain straight? Is the blade supposed
to pivot inside the blade clamps after being tightened? Because Ray told me that
the suspension is rigid and the way they are mounted on the rocker arms allows
them to stay parallel with the table.
Hopefully
I phrased the questions correctly.
The reason I asked the above is because the lower clamping surface is not parallel with the table. To me this would cause the blade to have more front to back movement than it should. But then again I am probably being too picky with the engineering.
Answer to 2
 Scrollin' with an Ex-21 http://tidewater-creations.com
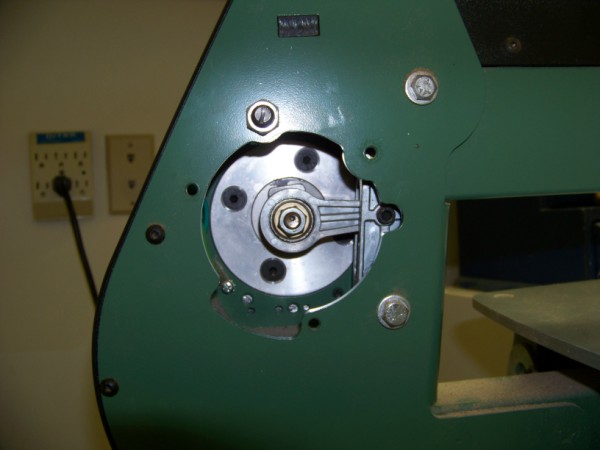
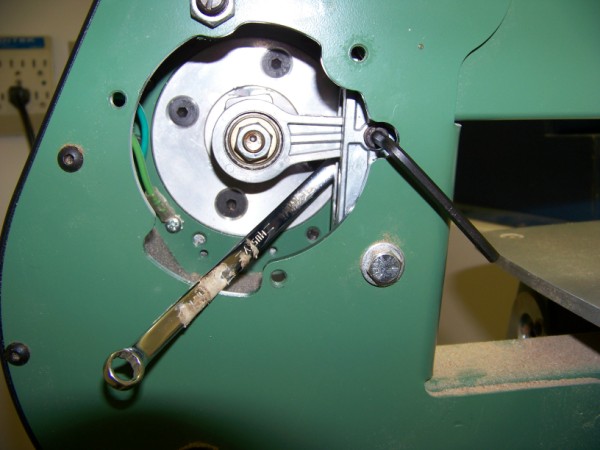
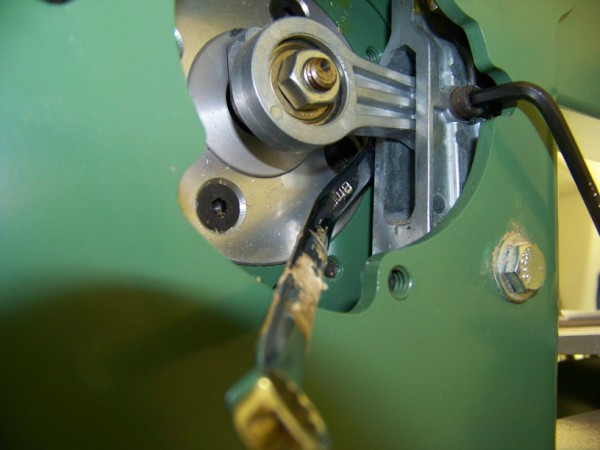
In recent months it has slowly but surely started running rough. Not really a vibration like before but seems to be in the upper arm. If I lift up on the arm the sound and vibration stop. I didn't realize how bad it had gotten until today when the speed control knob started clanging and I tightened set screw to fix it. Took note stock of the situation and realized how bad things are.
An update...decided to wait till after the holidays to phone Ray @ Seyco as I was sure this was going to be a long process that involved taking the machine apart and tracking down various potential issues.
Well of course I was wrong and it took all of 1 minute for Ray to diagnose...LOL
Did have to modify a wrench but all is well
My problem developed over time and it's best described as running rough with sounds and vibration getting much worse as speed is increased. At full speed the quick release lever would pop open.
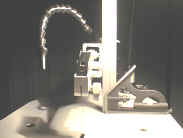
The repair was simple: remove cover from back of saw opposite motor and tighten screw in cut out area. If screw continues to turn you must apply a modified 8mm wrench to the back side and hold bolt. Tighten firmly.
As shown you must add a "bend" in the wrench. You can heat it and bend it in a vise or take a hammer and beat the tar out of it. I fully recommend the later as it works great and is a stress reliever as well 
I have added pics in case this wasn't clear.

Excalibar front to back movement:
From the Fox Chapel Forum: Jan, Southwest Florida and John B., Kalgoorlie, Western Australia
I have an EX-21 and the adjustment for the back to front oscillation is stone simple. Even I can do it.
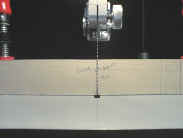
The motor has adjustment slots where it is mounted to the saw. Loosen the screws holding the motor in place. Run the saw at the slowest speed and slowly rotate the motor until the oscillation is gone or almost gone. Just turn the motor one way or the other and you will notice the oscillations decrease and increase. I found it was good to have a strong light and a piece of white paper on the opposite side of the blade so you can see the oscillation. I stuck a piece of white paper to a block of wood, put a vertical line on it, lined up the blade to the line and used that as a reference point.
John and I have discussed the instructions given to us by Ray at Seyco. I remember slowest, he sort of remembers fastest. I suppose it's whatever works for you. I suspect that the slow speed will allow you to see the oscillation a bit better. When you have accomplished this, tighten the screws. If you reach the end of the adjustment slot, remove the screws and replace them at the other end of the slot and keep slowly turning the motor as described above.
That is the way I was told, but I use a dial gauge set against the blade. Turn the motor with a screw driver in the slot on the end of the drive shaft, then adjust the motor as above until the movement is minimal and re tighten the motor.
I've received this instruction from Ray at Seyco also. He instructed me to do at high speed. I have had the opportunity to see him do the adjustment and noticed that he used slow speed. My guess is that he thought it would be easier for me to see the oscillation at the higher speed. Whichever way works best for you!
Another note on this: When I received my saw, the oscillations where horrendous. It ran as quiet as a mouse, and as smooth as a babies bum, but I almost sent it back because of the movement in the blade. The dills in Oz where I got the saw from never had a clue what I was talking about, never mind a fix for it. In desperation, after Pajaro advised it, I gave Ray, at Seyco, a ring. Problem fixed.
Some pictures from Randy Gloden:

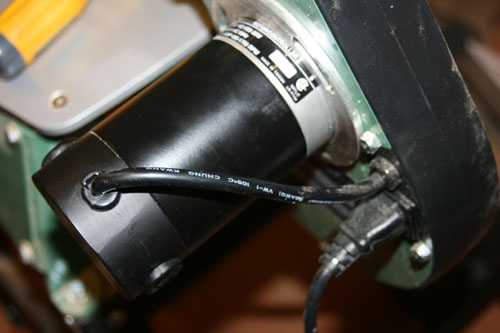
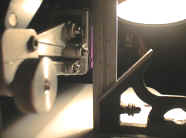
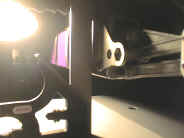
I did a close up of the slot to show how the bolts are moved from hole to hole as the motor is rotated. The third picture shows how the cord is attached to the motor. It isn't long enough to allow the motor to be rotated 360%, however, it does allow 180% which covers the full range of aggressive to nominal oscillation.
I found that the motor is very solid (it won't come out or budge), even with no bolts holding it at all. I found it easiest to just remove the bolts, then rotate the motor to make the adjustment. The motor should be run on slow (I tried fast with the bolts loose and that created noise that indicated such a speed wasn't good for that saw).
Anyway, hope these pics will help . . .
------Randy